Showing posts with label Altered Art. Show all posts

Sunday, 17 November 2019

Embrace

I keep forgetting to post pages from my new hardback book journal mainly because I cant stop playing which is the point really I suppose.

So how did this come about? Well i got hooked on a trip to see my friend Mags Woodcock about a month ago. One evening she showed me the book she had been creating in and I loved it so much I decided to start my own.

The book was £1 from a charity shop and was a bit brown and well thumbed. I only use my stash  and no specially bought products so its just a bit more "mine"

This double page started because we were all talking in class about the poppies for Remembrance Sunday and I had a few small circle punches in my craft bag.
 Initially I started with just a few circle flowers
but then I sort of got carried away.
 
This has become my go to book when I want to clear my mind and just play. Hope you like it xx

Sunday, 10 February 2019

Powertex Class

Late last year I was lucky enough to take a Powertex class with Tracey Evans. It was fantastic to be a student for a day and boy did I learn a lot. Here is the Unicorn that I made. It is sitting on my sideboard at home and is about as tall as an A4 picture frame.
I still can't believe I made it and I am forever grateful to Tracey for her time, patience, creativity and for sharing her vast knowledge.
 
I loved stamping into the clay and the process of painting and highlighting the mane.
I made a flower saddle to finish it off.
Can't bare to put him into the garden so he will stay in the house taking pride of place. Thank you Tracey for an amazing day. Off to finish my second piece so watch this space. xx

Thursday, 26 July 2018

Through the porthole

I love paying with cardboard. It has so many uses and was ideal to show off Lynette Jasper's Sprays. Here is the first project I made for the Pretty Gets Gritty Shows on Hochanda TV Friday 27th July at 10am and 3pm.
This took quite a bit of work but I love the way it looks like the inside of a rusty shipwrecks porthole showing the blue sea and its underwater sea life outside.
The bolts around the porthole are chipboard discs and a flatback bead on top.
The rivets are also flat backed pearls
And the lovely fish, crab and Starfish are all on the show.

The process I followed was this:
I used the back of my canvas as a base. I cut pieces of old corrugated cardboard and fitted it around the canvas and the MDF wreath shape I used as my port hole.
When I was happy with the look I stuck all of the cardboard in place but not the wreath.
Once dry I peeled off some of the cardboard to show the corrugated texture.
Next I added pearl as rivets along the joins in the cardboard. Once dry I started to Build my colours by painting the whole thing (and the wreath) in black gesso.Once dry it started spraying the background with Lynette's sprays, starting with the chalk sprays and allowing it to dry between each colour.
I followed the same process with the wreath/porthole but before I sprayed I used some of the marble effect texture paste to make the rust marks around the edges. Next I sprayed to match the background.
For the sea I scrunched up some kids drawing paper and then flattened it out. I then used the new chalk sprays and powders to create the background. I allowed this to dry naturally so that I got maximum lines and puddle marks.
I placed the paper under the porthole and stuck both in place on the background making sure that i created a small dip in the sea piece for the sea creatures.
Lastly I painted and stuck the sea life in the post hole and allowed to dry thoroughly.
The canvas looks very different in different lights. You saw the finished piece at the top of the page. Here is another photo taken outside.
If you have any questions please comment below and make sure you watch Lynette Jasper. The design team have all been busy making wonderful inspiration for you.
#prettygetsgritty #lynettejasper #hochandatv #craftbuddy #mixedmedia #newnanny

Thursday, 19 July 2018

It's just a bottle

As my love of mixed media has grown I have found myself squirrelling away all manner of bottles and jars. I just can't bear to throw them out and as if that wasn't enough I have actually been buying empty bottles from Poundland and adding those to me collection too.
Here is photo progress of one of these bottles and its transformation into a usable water bottle for the table.
So to start I painted the bottle with white gesso. I used Prima's Heavy Gesso as it covers really well. Next I added all manner of stones, sequins, beads, etc to the surface using 3D Matte Medium. I then left it overnight to dry thoroughly. 
Next I went over everything twice with the Heavy White Gesso and allowed to dry thoroughly. 
To finish I sprayed the bottle using three different sprays in blue, green and white. When dry I then dripped some more colour onto the top of the bottle and sprayed with water to allow it to run easily through the embellishments. 
Doing something like this is easy and cheap to do. You can use ANYTHING like small stones from the garden, buttons, shells from the beach, the possibilities are endless.x

Thursday, 15 February 2018

Hochanda TV Sunday 18th Feb

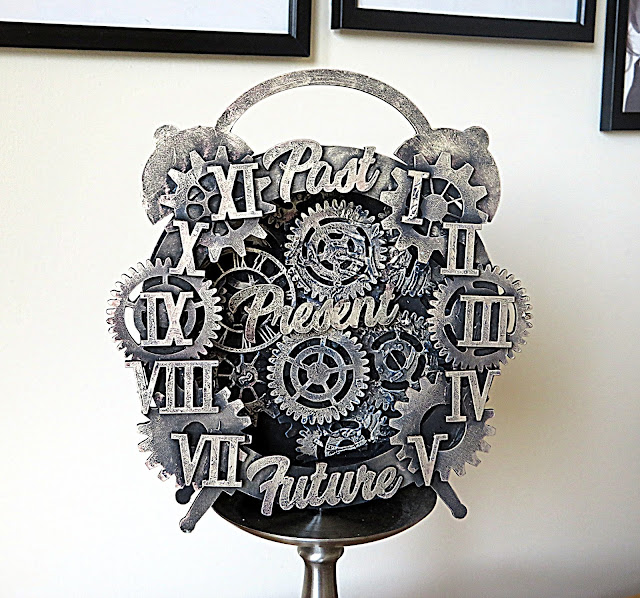
At last I can share a few pieces that I have made for the Pretty Gets Gritty with Craft Buddy. I have really enjoyed making these and you can see loads more inspiration on Hochanda TV this Sunday at 7am, 10am and 12noon. Don;t miss out because all of the products are really scrummy.

I have made a short video which you can see at the bottom of this post but first here the pictures.
Cherish
Past, Present, Future
Mantle Clock
and here is a video to show a bit more of the detail.
Hope you enjoy the shows xx

Friday, 25 August 2017

Work in Progress

I've started playing with some new stamps designed by "Nicole". They are great to use and so easy to colour in or paint.
More work to do but coming along nicely. x

Thursday, 24 August 2017

I'm back....

Its been ages since I posted on any of my Blogs mainly due to family health issues but I think at last everything is moving in the right direction. One of the good things is that in the last month I have become a great aunt to a beautiful baby girl called Belle. I'm sure she will appear on many of my projects in the years to come lol.

So what to share, well this piece was made as a colour sample canvas for one of my classes. The hope was that it would allow them to choose a colour combination for their own work.


I am still itching to add some white but I think it is better this way so that I can see how the colours work for future projects.
Here is a bit more detail including a picture just to show how it looks.

It was so much fun being able to work on a larger canvas. It's definately something I will do again.

The class project was a box. The one on the right is the finished box and the one on the left was done as an example in class.
Looking forward to the next one. Something a bit different next time xx

Wednesday, 14 June 2017

Spread Your Wings

I'm finding that I am getting less and less time to create for myself so I have started making more tags. It means I have time to completely finish something instead of keep coming back when I have a moment and they are great to use in journals, on projects and to send out to my crafty friends.
At the minute I am experimenting with paper straws and trying to make use of all of the lovely paints I have sitting on the side.
The background is made from tags and texture paste
and the butterfly is acetate painted with Finnabairs Art Alchemy paints. Enjoyed making this one. x

Wednesday, 15 February 2017

Always....

I have been so lucky to be accepted into the DecoArt Blogger Outreach Programme. It has been agony waiting for my box of lovely goodies to arrive from the USA and I wasn't disappointed.

I decided to choose only 6 products for my first project mainly to show beginners how easy it is to get great effects using a small palette.

My project is a Heart Box
There is loads of detail in there which I will show in a minute but first here is a list of what I used:
DecoArt Products:
DMM21  White Modelling Paste
DMM19  Black Gesso
DAO1     Snow White Paint
DAO15   Cadium Red Paint
DA148    Emperors Gold Paint
DA238    Canyon Orange Paint
Other items:
Wooden Heart Box
White decorative lace
White Flowers (2 sizes)
Decorative Chipboard
Moulded Shield
Plastic Hearts
Brick Stencil

I started out by using moulding paste through a brick stencil to add detail to both the left and right of the heart, adding texture paste to the centre of the heart using a palette knife and creating rough peaks pretty much like you would do with icing on a cake. Once dry added the molded shield and covered the whole heart with black gesso. 
Next step was to dry brush the Emperors Gold paint over the top of the lid to highlight the bricks and background detail.
At this point I decided to add the small plastic hearts and the chipboard embellishments.
Covering them in black Gesso and then, when dry, adding the Emperors Gold paint made them look like metal.

Next it was time to get the flowers and lace ready. I coated the lace in black Gesso and laid to one side to dry. It was important that the lace dried completely flat so I used additional Gesso to flatten any creases or folds as it dried.

The flowers I painted first with Canyon Orange paint making sure that the brush was not to wet. It took some time but I was pleased with the result. Next I added Cadmium Red paint to the tips of the flower petals and then dragged any excess into the centre of each flower. These took about an hour to dry out thoroughly.
Next I arranged everything on top of the box and stuck in place only adding "Always" when I was happy with how it looked.
The lace, now dry, was added around the side if the heart lid and stuck in place with a glue gun. If you try painting lace you will learn that as it dries it becomes stiff and much easier to mold around boxes and jars.

Once in place I dry brushed the lace and touched the tips of the flowers with Emperors Gold paint.
Then I dry brushed the whole thing with white Gesso. Here are a few close up photos of the finished project.


I really enjoyed making this Heart Box. I hope you enjoyed sharing it with me. If you have any questions please comment below. Off to play some more now x 

Wednesday, 19 October 2016

Things To Alter

A few months ago I was given a selection of dies-cut MDF shapes from Jaqi at Thinks To Alter. Unfortunately due to personal reasons I wasn't able to complete my project in time for the August DT spot but I kept everything safely in a box (because I normally loose anything that goes into my craft room) and today I actually managed to finish the project I have had in my head for so long.

Things To Alter MDF shapes are beautifully cut and so easy to use and there are loads to choose from. Even better this is a UK Company which I am happy to support.


I used an IKEA frame for the base but took out the glass.
It was great to get more than one size in each shape and each with so much detail.
The lettering comes in a variety of sizes and is great for canvas work, picture frames and scrapbook pages.
I added tiny pearl beads and micro beads to give a rich finish (remember when using micro beads apply with a spoon to glue and make sure unused ones go back in the pot.Never apply with a brush or wash away.  Do not put these down the sink as they are harmful to the environment).
I am teaching a Scrapbook Canvas class this weekend so for those of you coming along, we will be using some of these techniques in our project.

If you like to buy any of the MDF shapes  please visit Things To Alter xx

Monday, 16 February 2015

I so love messy craft days

Over the last few months I have been collecting “things” or rubbish as my DH says, ready to make a Finnibair inspired canvas.
I thought I’d start small and work up. Here is my first effort
IMG_4448
and some of the detail
IMG_4445
IMG_4446
I really enjoyed playing but I still have a lot to learn so there will be loads of play days for me in the near future and when I get it mastered, there will be a class promise.
Have a great week. xxx

Friday, 23 March 2012

Art Journal

As promised ladies here are the pages we made in class last night using images from the internet, paint, tea and laughter.
P1160148
P1160154
And this is the double I was working on in class now ready for you to have a go.
P1160149
This time I used the new PMA stamps, bubble wrap, napkins, Portobello Road paper and an image from the internet.
P1160150
P1160151
P1160152
Have fun and thanks for looking. xx